Nod crossbow blueprints. Winter tackle “Crossbow. Coloring a plastic nod
Great opportunities and the unique design of the "crossbow" allows you to achieve success. The adaptation is done quickly. You don’t have to spend a lot of time and effort on assembling a nod of a crossbow for winter fishing with your own hands. Experienced anglers note that if you go fishing with such a device in cold weather, there is always a chance to catch several large fish.
What is a winter rod

Summer fishing rods are different from winter models. They have a large length and other tackle. Also, the ways of fishing are completely different. Winter rod is very short. It has a simple design and moderately compact size. Winter models are always equipped with a "gatehouse" - the usual nod. With the help of such a device, you can see an instant bite, as well as play with bait, which in turn increases the likelihood of a catch.
For the first time, a crossbow rod for winter fishing appeared in the early 1970s. Therefore, this design is not considered a novelty. It has a shorter length and is equipped with a rubber shock absorber. Such a model is a little more difficult to manufacture, but it significantly increases the chance of a big catch.
The nod is mounted on the edge of the fishing rod and secured with wire, clamp or insulating tape. Hand-made rods for winter fishing are not inferior to factory models, and even surpass them in skillful hands. For high-quality manufacturing, it is necessary to adhere to the recommendations of professional fishermen, otherwise there will be no sense from a home-made rod. What does a crossbow winter tackle consist of:
- The basis of the product is a stainless steel frame with a cross section of 0.8 mm.
- The average shoulder width is 7 cm and the total length is 5 cm.
- The rubber ring serves as a shock absorber, which is pulled over the horns of the crossbow with maximum pressure.
- On the gatehouse and the hearth are cambric.
- It is preferable to choose a slow lock coil - this is the best option for a crossbow.
What actions can be performed with a crossbow in winter fishing conditions? It is possible to fish with different methods and with almost all types of baits, for example, by slow immersion of the bait, active or slow game, with ascent and at great depths.
When casting the bait, it is not allowed to keep the nod at a great distance above the water. After throwing, it is desirable to firmly fix the device in a horizontal position so that the edge of the crossbow hangs over the hole. You should not set up a gatehouse at home, it is better to complete this task at the fishing spot.
By reducing or increasing the speed, the crossbow is adjusted, since the mass of the bait may be different. This must be taken into account before going to the pond. As a rule, the auxiliary sinker is attached to the main fishing line.
Advantages and disadvantages of a crossbow
The crossbow nod is effective for winter bream fishing - it's a win-win. The device can be operated in strong winds and low temperatures. Fishing in fast current conditions is also allowed. The bait will be a worm, maggot, plant food and artificial holdings. The service life of the device is at least 4 seasons. The advantages include:

A do-it-yourself crossbow nod has few drawbacks, but they do exist. When fishing, the following nuances must be taken into account:
- If you make too frequent and strong movements, then the nod can be lifted up, so you should follow a smooth and slow game.
- It is recommended to sink the bait very slowly, otherwise the settings of the crossbow may be disturbed.
Required assembly tools
To make the device, you will need 8 parts, without which you can not do. Before assembling the structure, you should go to the store and purchase the following materials and tools:
- round fishing gum;
- whip;
- hard and light plate;
- waterproof adhesive;
- several cambric;
- a pair of heat shrink tubing;
- metal wire;
- pliers;
- scissors;
- a box of matches.
Step-by-step construction of a fishing structure
Experienced fishermen say that with the right manufacture at the exit, you can get a really effective crossbow, due to which the catch will increase significantly. The action plan looks like this:

By twisting the edges of the elastic, the device is adjusted. The coil must not have a locking device. The untwisting of the fishing line should not be fast. Otherwise, the adjustment of the crossbow will become much more complicated. The main task in fishing is the delivery of bait to the bottom of the reservoir using a home-made design. The parameters of the bait and its weight depend on the intended fish, the probability of catching which is very high. Do-it-yourself crossbow guard can also be made according to your design preferences.
Most anglers are familiar with such an original and simple device as a nod "crossbow" for winter fishing. It's easy to make and takes a little time. The main thing is to get acquainted with the basic principle of its operation and device.
The ice fishing gear has a small length and a simple design. Most models of this series are equipped with a nod - a kind of bite signaling. Many fishermen call it "the gatehouse".
Tackle "crossbow" is intended mainly for hunting. It is a small fishing rod with a rubber shock absorber on the body.
"Crossbow" allows you to hunt bream at great depths, with different baits and in different ways. It can be adjusted depending on the type of bait. With different bait weights, the number of revolutions is increased or decreased.
Tackle is used not only for catching bream, but also for roach and crucian carp. With its help, you can get any fish, for catching which you do not need to use an active game, but only choose the right bait.
The design of the nod "crossbow"
The device of such a fishing rod is simple: it resembles an ancient weapon, for the similarity with which it was called the “crossbow”.
An important detail in it is the frame, which is made of stainless steel. The diameter of the rods is about 0.9 mm. The sides have a length of 5 cm, and a width of no more than 7 cm. We get the design of a slingshot.
The side parts at the ends of the rods have bends in the form of hooks, a rubber ring is pulled over them. The cambric is placed on a nod or on a six.
The elastic band on the slingshot is selected dense and elastic. Stretch the fishing line through the passing cambric. A fishing rod for a crossbow is needed with a reel that has a smooth fixation.
Catching with the help of a “crossbow” requires skill: when throwing tackle, the nod of the nod is not raised high above the hole. The frame itself is set at such a distance that the fishing rod, like an arrow, is in the center of the slingshot. The nod is placed in a horizontal position on the main element. An additional sinker is placed on the tackle. It is attached to the line.
Pros and cons of the "crossbow"
Tackle "crossbow" allows you to hunt for fish in severe frosts, with a large current of water, at a depth with steep slopes and even with gusty winds. The device is durable. With proper use and storage, it will last at least 3-4 seasons. You can attach any bait to the bait: these are worms, plant food and other types of bait. Effective in catching and jerks.
Tackle Benefits:
- with a rubber shock absorber "crossbow" shows a light and careful bite;
- when the fish is pulled out of the water, due to the specific design of the fishing rod, the weight of the hook, the weight and the resistance of the nod are not felt;
- the device quickly, easily and easily adjusts to any type of bait and allows you to use various fishing techniques;
- makes it possible to hunt in any weather and with a strong current.

Flaws:
- the setting of the "crossbow" quickly goes astray and requires constant adjustment;
- requires skill and experience. The movements must be smooth and careful, otherwise the nod will constantly lift up.
How to make a nod "crossbow" with your own hands
materials
To make a nod you will need:
- stainless wire;
- fishing whip;
- heat shrink tubing;
- rubber;
- cambric;
- special waterproof glue;
- fishing plates of two types: light and heavier.
Tools
To assemble the structure, you will need a sharp knife, matches, scissors and pliers. The process will not take much time if you take measurements correctly and clearly fix all the elements on the frame.
Manufacturing procedure
To begin with, it is worth preparing the base of the frame. Use a steel wire 20 cm long. Side horns - 6 cm. Bend to the transverse bar - 1 cm high. Between the sides along the maximum width, the length is 7 cm.
With the help of a heat shrink tube, the frame is fixed on the whip, while leaving about 5-10 mm from the edge of the whip to the arc. The cambric is fixed with special glue to the place where the frame is attached.

A ring is made of rubber by tying its ends. It should easily cling to the slingshot without strong tension. One hard plate is attached with fishing glue to one side of the cambric.
The nod is inserted into the tube so that it is between the rubber bands. Such a gatehouse resembles an arrow for a crossbow. It is fixed to the frame, and the finished structure is inserted into the fishing rod. A fishing line is pulled through the cambric and weights are attached.
For successful fishing, you need to constantly adjust the frame setting by winding the rubber bands. The line should come out easily and smoothly, and not be under tension.
Secrets of fishing with a nod "crossbow"
Using the "crossbow" requires skill. This type of tackle likes a smooth, inactive game. It is necessary to avoid sharp and jerky movements in the process of fishing. At the signals of a bite to rise, gently and slowly raise the prey. When setting up the lodge, the baited mormyshka should touch the bottom.
During fishing, bait is not planted. The masterful game of the fisherman himself and his professional skill when using tackle are important here.
To make a homemade crossbow you will need:
* A bar of non-resinous wood species, size 700x10x40 mm.
* The second sheet of the spring of the car Moskvich.
* Profile pipe 50x50x2 mm. 10 cm long.
* Profile pipe 15x15x1.5 mm.
* A small piece of sheet metal 2 mm.
*Metal stainless steel 4 mm thick. and 0.5-1 mm. (for the descender).
* Corner steel 50x50x4 mm. 35 cm long.
* Bar D=8 mm. 40 cm long.
* Bolts with nuts D=8
* Stainless steel molding from the door VAZ-2106 2 pcs.
*Metal rollers 2 pcs., glass lifting mechanism from the door of a VAZ car.
* Rope D=3 mm. 3 m long, two terminal loops.
* Epoxy resin, wood stain, wood varnish for outdoor use.
*Two small springs (working in tension).
* A dozen nails for roofing felt, one nail two hundred, tube D = 6 mm., Small washers.
We will use the following tools:
*Welding machine.
*Saw circular manual.
* Electric drill with speed control, carbide drills for metal D=3, 5, 8, 10 mm.
*Bulgarian, cutting discs for metal, grinding discs for wood.
*Keys, pliers, screwdriver, vise, narrow chisel, knife.
*File, sandpaper.
* Goggles.
Item 1. Making a bed.
Let's take a well-dried wooden block, I had a birch, sketch a bed on it. We make the size of the butt each for ourselves (for our height), and the bed, depending on the length of the arrows that you will use. I use 440 mm arrows, but I had to save money on the butt, I left only 300 mm, the total length turned out to be 740 mm, I didn’t risk doing it anymore.

Let's draw a markup for the selection of the guide, for the plumage of the arrow, width 5 mm, depth 10 mm.

Using a circular saw, we cut out the groove for the entire length, to the end of the trigger (lock).

It should look like this.

Using a drill D=12 mm. we select the cavity for the trigger, level the ledges with a chisel and a knife. We drill a hole for the trigger, bore it with a chisel and a knife.

Point 2. Making a lock or trigger.
For the basis of the lock we take the type "nut". So that nothing rusts, we will use stainless steel, take a sheet 4-5 mm thick, if you can’t find one, make a typesetting of several sheets glued together and riveted. We draw the shape of the details on the metal.


Using a cutting disc and a grinder, we cut out according to the marking of the workpiece.

In the center of the "nut" we drill a hole for the axis of rotation D = 6 mm.

We process all sides with a file.

We grind with sandpaper, achieving a completely smooth surface.

It should turn out something like this.

We grind the rest of the elements of the castle, sear.

I lengthen the trigger with two thin sheets of stainless steel, fix it with homemade rivets.

On the grinding machine we achieve the desired shape of the blanks.

From a thin sheet of metal we make the body of the trigger mechanism.

We drill three holes D = 2.5 mm in the body of the sear, one for the mounting axis and two for mounting the springs.


Attach the trigger spring in place.


Let's see how the parts become in the cocked state on the table.

And as after the shot.

We attach one side of the case to the inside of the mechanism and drill holes for all the axles in place.

From a two-hundred nail, 6 mm in diameter, we will make an axis for the "nut".

Saw off the sharp end of the nail.

We measure the length of the future axis, saw off.


From thin nails for roofing material, we will make the rest of the rivet axles. We will remove the ebbs on the nail heads with a grinder.

Now they fit well to the body.

Install the sear on the axis in the body, use the intermediate washers.


Saw off the excess length of the nail, leaving 1 mm. on both sides for rolling.

Using an anvil, hammer the end of the axle with a hammer.

We drill a hole for the axle with a spacer, for fastening the spring sear.

From a suitable tube, cut off the spacer sleeve on this axis.

Move to one side of the body.

We install the axle, bushing and hook the spring.

Assemble the body halves together.

We saw off the excess length, leaving a protrusion of 1 mm. under the hammer

Let's roll.

Now you can put the largest axis-rivet of the castle. Align the holes.

Let's take the previously measured and sawn off axis D = 6 mm., Immediately tap a little with a hammer on one side.

We install in place.

And we will also roll, the main thing is not to overdo it, so as not to pinch the movable mechanism inside.

Point 3. Installing the lock mechanism in the box.


If something prevents the castle from sitting well in place, we refine it with a chisel or knife. After installation, we check how the trigger goes.

If everything is fine, you can drill holes for the mounting screws and screw them into place.


Now we need decorations from the VAZ-2006 door, they are also made of stainless steel, which is very good. To give them additional rigidity, epoxy resin was poured inside.

After complete hardening, in a day, we will drill four holes D = 3 mm in each, for fixing screws.

With a large drill, we will make hiding places for the heads of the screws so that the bowstring cable does not catch when it slides along it.

We polish the exits of the holes with fine sandpaper to remove all the burrs that damage the cable.

We install the finished guides on the bed.

We make sure that the screws do not go through in thin places.

We check that the lock goes without hooks on the guides.


Item 5. Making an arc or shoulders.
From the same donor doors, we extract with the help of a grinder, the rollers of the glass lifting mechanism.

Of these, we will make blocks for the shoulders, and the arc itself from the second leaf of the spring, an old Moskvich car.

Let's make blocks, for fastening of a spring to a bed.
To do this, from a corner of 50x50 mm. we cut out the constituent elements to assemble by welding, here is such a mount (block).

We will process the welds with a grinder. Drill mounting holes D=10 mm. under the bolts.

According to the finished sample and the dimensions of the resulting block, we make grooves for fastening in the box. We try on the fit, achieve a tight entry and fastening. According to the calculated position of the future bowstring, we outline and make a through groove in the sidewall of the bed, 70 mm long. 10 mm wide, lower bowstrings will go here.

We bend and weld the leg brace (stirrup).


Ears for blocks.
From a profile pipe 50x50 we will make lugs for attaching roller blocks to the arc (spring).

The most difficult thing in making the arc itself from the spring at home is to drill holes in it. It is necessary to drill with a drill at low speeds so that the drill does not burn, constantly apply water. If possible, drill with drills of different diameters, from thin to thick in increments of 0.5-1 mm., constantly sharpen the tool.
We fasten the brackets to short M8 bolts, grind off the hats.

We fasten the spring to the block with two M8 bolts, followed by a small welding along the edge of the fastening.


Now you need to open the bed with varnish and dry.
We install a block with an arc on the bed, upset with a hammer for a tight fit of metal-wood.

We insert and tighten the bolts on M8.


From long M10 bolts we will make axle bolts reduced in length with a short thread for blocks.

We take a tube from the anchor and make spacers for the axes of the blocks out of it.

Let's drill holes D = 10 mm in the ears. to install blocks. Install rigid loop ends on the cable.

We install a block with a cable on one side of the shoulder. Do not overtighten the nut so as not to pinch the rotation of the roller.

We drill a hole for the stud in the nut and bolt.


Install the stud and tighten it with a nut in the direction of unscrewing.


We push the cable through the hole in the bed and do the same with installing the roller on the other side of the shoulder.

Point 6. The upper part of the castle.
From a profile pipe 15x15 mm. saw off two segments of 120 mm. We cut out two (L) shaped blanks from sheet metal with a grinder, one rectangular plate (on top) and a triangle (on the back).

By welding we connect all the parts together, we clean the welding seams with a grinding disc to get a kind of one-piece part.

From an old folding steel meter, we make an elastic arrow holder.

The photo shows the bolts for mounting the rail under the optical sight.

The same thing, only the bolts also clamp the boom holder at the same time.

The sight rail itself (dovetail) is made of the same 2 mm sheet metal, with the sides ground off for mounting the optics.

A square lining is visible along the optics rail to raise the back and thereby tilt the sight down, for proper aiming at a target beyond 25 m.

We install the lock bracket on the bed and drill holes for fastening, self-tapping screws and an M6 bolt.


We twist small self-tapping screws so that they do not go into the channel of the plumage of the arrow.

We twist the back screw.

In addition, we drill a hole and install the last bolt.


Installing an optical sight.


In stationary winter fishing, a crossbow nod is used for catching fish with a bottom type of food. Bream, crucian carp, large roach, when picking up food from the bottom, suck up edible particles like a vacuum cleaner, along with soil and sand. At the same time, these fish automatically get rid of inedible particles, swallowing only feed. Therefore, having felt the heaviness of the mormyshka or the tackle in the mouth, the bream or crucian immediately tries to get rid of the inedible component. Due to its design, the crossbow guard neutralizes the weight of the bait when lifting, which allows the fish to easily swallow the bait. In this article, we will consider in detail the features of fishing for such a winter fishing rod. Let's figure out how to make the right nod for a crossbow for winter fishing with your own hands.
Winter fishing rod crossbow
The winter crossbow bite signaling device is a nod with a large bend angle. It works on a similar principle. The amplitude of his work between the upper and lower positions is much greater than that of a standard blank gatehouse. This allows you to achieve better neutralization (compensation) of the weight of the mormyshka or sinker when lifting the bait with fish from the bottom. The use of winter tackle crossbow is important for catching bottom fish.

Application features
Like any other fishing hacks, the nod of a crossbow with a rubber shock absorber is designed for certain fishing conditions. This is not a magic wand for all occasions. Such tackle is suitable for stationary, as well as crucian carp, roach, ide and other fish from the bottom in stagnant water or in a weak current. Therefore, the scope of such a fishing rod is fishing on a riser. It is impossible to play a jig with such a gatehouse, at most - slightly move the equipment sometimes to additionally attract fish.
Advantages:
- Tackle sensitivity (subject to the correct setting for the weight of the rig)
- The ability to adjust for different weights of baits without alteration, right on the pond.
- Compensation for the weight of the rig when biting - the fish does not feel the weight of the mormyshka (weight) and the resistance of the guard, continues to try the bait.
The main drawback is the inability to switch from stationary fishing to an active game. Perhaps only a slow and careful twitching of the bait. Otherwise, with sudden movements, the arrow of the gatehouse will rise up. You need to lower the equipment into the hole slowly and smoothly. However, all this is offset by the sensitivity of the gear.

Another feature is the convenience of testing a large number of remote wells. The crossbow clearly shows that there was a bite - if the arrow is raised up. Thus, it is possible to use such gatehouses in search activities in the squares. When bypassing remote gear, you can immediately see whether there were bites or not. The guard after a bite is in the upper position and does not fall back, the tackle needs to be reinstalled. When determining cool holes, all fishing is transferred to the points where there were draws - this is a signal that the fish is present here.

Lure weight compensation principle and nod shoulder
The need for weight compensation is detailed in the article on. The nod crossbow for fishing is specially designed to perform this function as correctly as possible. The main disadvantage of the usual gatehouse is the small lifting amplitude. When unbending when biting on the rise, the nod blank takes weight from the mormyshka lifted by the fish in the process of following the tip from the lower position to the upper one. When the top point is reached, weight compensation no longer occurs and the fish begins to feel the weight of the bait, which leads to spitting out the bait. A working spread of even 10 cm may not be enough, especially when catching large bream or crucian carp. The crossbow works at an amplitude of up to 15-20 cm (depending on the length of the arrow). To the working amplitude of the nod itself, another stroke of the arrow on the rubber shock absorber is added.


fishing technique
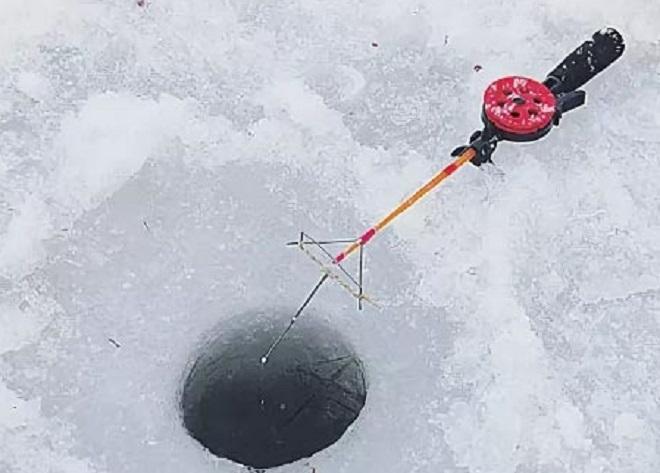
As already noted, winter fishing with a crossbow is a stationary fishing for bream and crucian carp, as well as large roach from the bottom in winter or summer from a boat vertically. Equipment with a nozzle is lowered into the hole, the guard is set to the working position. Naturally, the crossbow itself must be clearly tuned to the weight of this equipment - otherwise it simply will not work. With a careful bite, the nod arrow rises and trembles in a certain middle position. When the nod rises, stops and does not fall - the nozzle is in the mouth of the fish, you need to hook it. The rubber damper tends to raise the gatehouse to its maximum point. If the fish throws the bait in the process, the arrow will jump to the top position (the reverse if there is no limiter in the design). Tactically, crossbow fishing in winter is no different from standard fishing. If it does not take on the riser, it is sometimes recommended to gently lift the bait from the bottom and tap on the bottom to play with it.
Device and adjustment for the weight of the equipment
There is no single device for a crossbow winter fishing rod - there are many design options, but they are all made on the basis of a single principle. The base is a rubber band-shock absorber, twisted in the opposite direction from the hole (to raise the nod, and not lower it). The harness is attached to the horns of the wire frame. An arrow is inserted into the twist in various ways. The simplest is in the slot of the cambric put on the flagellum. The arrow itself is more often an ordinary lavsan or metal nod, but solid thin blanks (for example, carbon fiber) can also be used. It's just a lever.
The twist seeks to turn around, respectively, raising the gatehouse. This force is limited by the gear load. The correct setting is the selection of the number of twist turns. The more turns - the stronger the twist raises the arrow. The greater the mass of the equipment is required to balance the system.
To adjust the fishing winter tackle, the crossbow is removed from one horn of the shock absorber and makes a turn, put it in place. We do the same on the other side. To increase elasticity, twist towards the rod, to decrease, vice versa, let go. The frame itself, on which the elastic is attached, can be of various shapes made of plastic or metal. Well, if the design provides for a limiter - then in the maximum upper position the arrow rests against it. If there is no such limiter, then the gatehouse in the upper position will bend in the opposite direction by 180 degrees and lie on the fishing rod, which is inconvenient.
There are many designs of such nods. They differ in the manufacture of elements - the frame itself, the method of attaching the elastic band. In the most thoughtful models, the elastic is not just attached to the horns of the frame, but is hinged through special caps that can rotate. Thanks to this, you can adjust the elastic by simply twisting these caps without removing them from the horns. This setting is thinner - you can twist the cap to any value, and through the removal of the minimum step - one turn.
In the process of adjusting the elastic, we ensure that the equipment in the water barely keeps the nod from rising. To install in the working position, when the equipment is already almost completely lowered into the water, smoothly lower the tackle to the bottom. At the same time, the nod should remain in a horizontal position (or slightly lean towards the water). Do not make sudden movements - otherwise the arrow will rise. Excess line is removed (given away) by a reel.
Video of making and setting up a do-it-yourself crossbow nod:
rigging
There are no special montages for equipping a winter fishing rod with a crossbow. Depending on the conditions of the reservoir, the entire set is used in still water. More often it is one mormyshka or a sinker with a hook and a shed. Any installation is suitable for working tackle on lifting from the bottom. Naturally, a heavy sinker at the end and a retractable leash will not work. When biting, all equipment should rise - this is the main principle of operation of a winter fishing rod with a crossbow nod. The crossbow only works with bottom lifting rigs.
The crossbow requires a fishing reel. This is necessary for an accurate working descent. Excess line on tackle with reels up to a centimeter cannot be removed.
In fishing shops, you can occasionally find ready-made crossbows. However, more often they are imperfect and made without taking into account all the necessary details (for example, without a limiter). Therefore, anglers make such gatehouses on their own. Special knowledge or skills are not required for this - you can literally assemble tackle on your knee with the simplest tools using improvised materials. Let's figure out how to make a crossbow for a winter fishing rod with a nod.

Do-it-yourself crossbow tackle
We will analyze the manufacturing process of the popular version of the do-it-yourself crossbow gatehouse, based on a wire frame. This will require the following tools and materials:
- A piece of wire 30-40 cm in diameter 0.9-2 mm, stainless steel or non-ferrous metal. The wire needs to be strong enough. Too soft metals will not work.
- Elastic band (aircraft model round fishing or plain with a square section).
- Silicone cambric of the desired diameter (so that the flagellum of the folded elastic band passes through)
- Materials for attaching the frame to the rod whip - heat shrink tubing, thread, braid, glue, epoxy, etc.
- A nod for an arrow.
- Knife, pliers, awl, lighter.


Frame
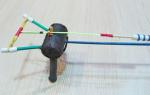
The basis of the crossbow is a wire frame. The configuration may be different, but it is still better to follow certain sizes, as they are selected empirically after the practice of many anglers in the pond. The frame is bent so that the front part is approximately 5-6 cm wide (the distance between the horns for attaching the elastic). Lateral branches - about 7 cm, converge in a triangle at one point for attachment to the whip. In the simplest version, these can be two wires diverging to the desired distance. However, it is better to bend the frame with the nod top limiter (pictured). The horns should diverge slightly to the sides so that the elastic does not come off.

shock absorber
The elastic is folded in half and tied with a slight tightness on the horns of the frame. You can tie with ordinary knots and cut off the ends. We put on a cambric with a slot for the arrow on the flagellum and put the entire shock absorber on the horns, inserting them into the end loops of the twist. The flagellum should be slightly taut, not sag. You don't need to drag either. The nod is inserted into the slot of the tube so that the blank passes between the rubber bands and comes out on the other side by 1-2 cm, and at the same time it is tightly held in the twist.


Arrow (nod)
For the arrow, we use a rather rough nod - so that under the weight of the snap, it bends only a little by itself. You can also use generally rigid blanks, for example, thin carbon sticks. The shock absorber does all the work. More often, anglers use ordinary lavsan or metal nods 13-15 cm. For lighter nods, for bream for the depth of the current - long and elastic. The rigid carbon nod of the crossbow is advisable to use with heavier equipment, for example, for fishing in the current and at great depths.

Attachment to the rod
It remains to attach the shoulders of the structure to the fishing rod. This can be done in any suitable way. The simplest thing is to insert the ends of the wire into the cambric, in which after that there will be a gap for pulling on the whip, or wrap it with electrical tape. More reliable - secure everything with heat shrink. The strongest way is to make a harness like on the through rings, wrap it with braid and seal it with a moment, superglue or epoxy. Any waterproof adhesive based on cyanoacrylate will do. Do-it-yourself winter fishing rod crossbow is ready - it remains to twist the elastic band to fit the weight of the equipment, adjust the carrying capacity.

Versions
There is no single drawing of a do-it-yourself crossbow for winter fishing - how many anglers, so many opinions. And everyone considers their design to be the best. The main thing is that the shock absorber works, the rest is a matter of personal preference. For example, you can conjure with the method of attaching the elastic band to the frame. Not just tie it, but place it on hinged caps so that you can adjust the tightness without removing the elastic.

Summer crossbow for fishing from a boat with a limiter, caps and a carbon guard
Crossbow for bream
Crossbow for bream
Simple effective tackle
Breeschatniks, as a rule, are solid and largely conservative people. From the ice they catch either on float fishing rods or on nodding ones, and each of these gears has its own undeniable advantages. However, both have a number of shortcomings that I would like to get rid of. This is what will be discussed.
float rod
Good for catching scavengers on the stand. Usually the bream takes from the bottom, standing obliquely, head down. When the nozzle is in his mouth, he assumes a horizontal position, the equipment rises and the float emerges. If the tackle is properly debugged, then such a bite is clearly visible and the angler has every chance of a successful hook. True, there is one, but a very significant but. Large bream often, having taken the bait, continues to move in the same position, head down. The float, of course, does not float, but, on the contrary, sinks. As a rule, having felt the resistance of the equipment, the bream immediately spits out the bait. It is quite difficult to notice that the sunken float has sunk a little deeper, especially if the hole is covered with at least the thinnest ice. The angler simply does not see the bite, and many, even noticing the movement of the float, still do not hook - they are waiting for the classic rise. As a result, the bite of a good fish is missed. Also, quite often a bite goes unnoticed and when the bait is knocked on the bottom, wanting to stir up the fish.
Classic gatehouse
The gatehouse allows you to play with bait and catch not only from the bottom, but also in any horizon. It shows well even slight bites both up and down, and reacts to a bite much faster than a float. However, the gatehouse is not without its shortcomings. The more it straightens after a bite, the more the fish feels the weight of the bait. With a careful bite, this leads to the fact that the fish, having raised the nozzle, feels an increase in weight and throws it. Finally, unlike a float, the gatehouse does not allow you to put an additional sinker, which is necessary when fishing at great depths with shallow bait.
Bream crossbow
The enumeration of the advantages and disadvantages of float and nodding fishing rods could be continued, but the above is enough to understand what the advantage of the so-called crossbow is. The idea of using a rubber shock absorber in a winter rod is not new, however, as a rule, all the proposed options are difficult either to manufacture or use, and often both.
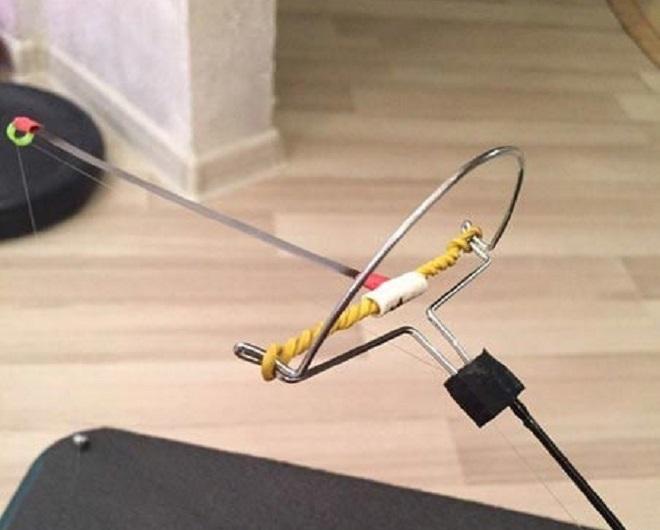
The design that I use is very advantageous in this respect. It is easy to make, and there is practically nothing to break in it, which confirms the experience of the past three seasons. The crossbow device is very simple (see photo). The frame is made of wire, preferably stainless steel, with a diameter of 0.8-1.0 mm. The length of the shoulders is 5 cm with a total width of the structure of 7 cm. The shock absorber is a round rubber ring. It should be such that when put on the horns of the crossbow, the rubber is only slightly stretched. The crossbow is rigidly mounted on a six. Cambric to pass the fishing line are located on the six and on the gatehouse. All these, so to speak, are the basic principles of design, and then there are details that determine a lot. First of all, the rod itself. It is better to use models with a reel fixed with a small step of the angle of rotation, otherwise the tackle is difficult to adjust. The reel of most fishing rods is fixed only at four points, and you have to saw through additional grooves yourself. The work is simple, but it is still better to choose the right model.

I make a gatehouse 8-9 cm long and 1.5-2.0 mm wide from a fragment of an old carbon fiber fishing rod. You can use another material, even without elasticity. The main thing is that it is strong enough and as light as possible. The guard is attached to a rubber shock absorber by means of a piece of plastic tube with two slots. In order for the shock absorber to work well, the base of the gatehouse must pass between the rubber threads. It is easier to assemble the shock absorber if the guard tube is transparent. I fix the access tubes on the six with heat shrink tubes, and glue them to the gatehouse. The frame of the crossbow is mounted on a shestik so that between its top and the rubber shock absorber there is a gap of 2-3 mm, which ensures the free swing of the gatehouse.
Although not a panacea, but ...
The gatehouse is set up at the place of fishing. The lifting force of the gatehouse is the greater, the more the rubber shock absorber is twisted. By increasing or decreasing the number of revolutions, you can adjust the guard to any weight of the bait. As with float tackle, it doesn't matter if there is an additional sinker on the line or not. Since the gatehouse's own weight and inertia are minimal, its sensitivity is maximum. Thanks to the shock absorber, the elasticity of the gatehouse does not decrease when lifting, and the fish practically does not feel the weight of the lifted mormyshka and sinker. When setting up a fishing rod for a bream, I do not lower the tip of the nod to the water, but set it almost horizontally. In this position, it captures bites well both up and down, like a regular flexible guard made of elastic material. In general, the described design allows one tackle to catch with lures of any weight and at any depth, including for the game, with the bait rising and lowering. However, there are also some limitations. If you can raise the bait at any speed, then you have to lower it slowly and smoothly - otherwise the shock absorber lifts the guard all the way up. Therefore, it is better to lower it in steps so that the gatehouse is constantly in working order.

The bite on the lowering often looks like the stop of the gatehouse, as if the bait has reached the bottom. The bream usually bites on the rise of the bait, but the roach and white bream, on the contrary, on the lowering or at the stop of the bait. Since a quick game with bait is impossible, tackle is not very suitable for catching perch. The crossbow has another useful feature. If the transverse bar is bent back so that after biting on the rise, the gatehouse is in a vertical position, then when the fish throws the bait, it will not fall back down. This is very handy when looking for fish. Having placed several fishing rods on promising holes, after some time you can go through and see where the bites were - you can’t do this either with a float tackle or with an ordinary nod. Of course, the crossbow is not a panacea for the lack of bite, but it provides anglers with additional opportunities and conveniences both when looking for fish and in fishing itself.
Issue number 4/2010
Attention!
An article from the site "