How the figure eight tent is assembled. How to assemble a tent: tips from experienced tourists
To choose a tourist tent for yourself, it is advisable to familiarize yourself with what they are. For starters, you can view their classification. When choosing tents, they usually pay attention to their shape, which will directly affect their stability, comfort and capacity.
What are the types of tents
The shape of tourist tents can be:
- Dome (hemispheric), which are used mainly by hunters and tourists. Such tents can be quite stable, they protect well in bad weather and when strong wind. They are easy and quick to unfold and fold. However, such tents have a significant drawback - a fairly solid weight of 4 to 6 kg, thanks to the frame arcs;
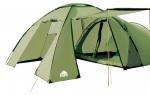
- Tunnel (semi-barrel) or hangar tents, which are something like half a cylinder. Such tents are more spacious than the previous type, but tunnel tents have less stability;
- Tent is the oldest type of tent. The tents are easy to install, have a low weight (3-4 kg), but are inferior to the two previous options in many respects. Tent tents can have spatial frames, be installed on central stakes, stretched with guy wires, or can be hung from trees;
- Tourist (trekking), which are made of high-quality and durable types of fabrics, have water-repellent impregnation and weight not exceeding 2.8 kg;
- Storm (extreme), designed for serious trips. They have more stable structures that can protect people from showers and winds;
- Ultralight tents that weigh no more than 600-800 grams. The "insides" of the tents are minimized, they are hammocks with awnings, and single-layer fabrics serve as the material for their implementation.

It is desirable to set up tents on flat, smooth and dry places. Of course, this is not always possible, especially in the mountains.
How to fold a tent in a figure eight

To begin with, the structures are stacked so that they become gentle. To do this, opposite sides are taken and brought together as if the book should close. The frames of the tents are semi-automatic, so voluminous structures easily take on flat shapes. However, their shape and size are not so important. Based on the models, the result should be rectangles, squares or triangles.
Next, the resulting structures must be picked up and placed in narrow parts on the ground as an emphasis. For example, if triangles are obtained, then the tops should focus on the ground, and the wide bases should remain in the hands. Then the lower parts are pressed down with their feet, and the upper parts are bent to the ground as if they want to lay the canvases in half. From the moment the frame arcs close, the joints are pressed by hand. After that, the right and left corners of the resulting shapes are folded one on top of the other. In the course of this, the corners themselves will begin to curl.
In semi-automatic tents, with the right effort, the frames themselves fold into small circles or ovals. When bending, the arcs will begin to wrap themselves inward, you just have to come to their aid a little. In the end, some sections of the tents are tucked inside the resulting circles and the assembled structures are removed into covers.
Connoisseurs recommend for a better understanding of the structure of the frames to practice assembling awnings in pairs. For this, canvases are taken from two sides, and people go towards each other. Then one will have to hold the ends firmly, and the other will have to twist the corners towards the middle. Some self-standing camping tents, such as multi-person, high-ceiling tents, may have additional frame elements such as supporting center axles. Such parts are usually removable and have similar assembly systems.

How to assemble a winter tent figure eight
In winter tourist tents there are external and internal frames, they may have locks and Velcro. Velcro designs are slightly different from ordinary ones. To fold them, all Velcro, locks are closed, after which one of the corners is pressed inward to obtain a kind of book. Then it is positioned so that one corner is turned “towards itself”. The lower ribs are pressed to the ground, while the upper ribs are bent forward and down, then packed into cases.
Most urban residents like to relax in nature to be away from the hustle, traffic and problems. It is much more pleasant to sit on a picturesque forest clearing, where birdsong and nature pleasing to the eye make it possible to forget about everything in the world than to sit in an apartment and admire the skyscrapers and rows of cars.
If you plan to go, for example, to the forest for a few days or overnight, you should know how to assemble a tent so that you have somewhere to sit and sleep. Tourists know this best, so it would be more correct to learn some of their skills and listen to their advice.
So how do you assemble a tent? The scheme is quite simple, but before considering it directly, you must first decide how to choose the right place for installation, because this is also important:
- First of all, you need to choose the most even surface. If such an option is excluded, then the installation must be carried out taking into account that the heads of the sleepers are on a raised platform.
- The place must first be cleared of obstacles, that is, stones, leaves, sticks and other debris.
- It turns out that in search of a solution to the question of how to assemble a tent, you must also pay attention to the fact that it is best not to place it in the immediate vicinity of the fire. Otherwise, there is a risk of fire.
- You should also not put it near the water to hide from dampness and the morning chill that comes from rivers and lakes.
- The entrance to the tent should not be blocked by trees, shrubs and other external obstacles.
How to properly assemble a tent? First of all, everything depends on its design, complexity, as well as on the experience of the assembler himself. Therefore, the time can be spent on it from several minutes to a couple of hours.

The whole point is that general principle The design of all types of tents is the same, so there are some universal tips that apply to all types. Initially, all racks, the tent itself, as well as the entire set of pegs and stretch marks (if available) should be removed from the cover. The following is a diagram of how to assemble a tent:
- If the tent is two-layer, its inner part should lay down to the ground.
- Then you need to assemble metal racks and arcs.
- Racks should be inserted into the tent and tied with those tapes that are specially designed for this. After carrying out this procedure, the structure must be raised.
- Then you should throw the outer awning, put it on the racks and secure with ribbons.
- With the help of pegs, the bottom of the tent is fixed. They are inserted into special recesses or loops and clogged at an angle of 45 degrees.
- Stretch marks, if provided for by the design, are installed symmetrically.
- The final stage is the control of the correct tension of the awning. You need to check that there are no extra wrinkles. All defects must be corrected.

Of course, each design has its own specific features and requirements, which are spelled out in the instructions for the product. Therefore, in this case, patience and accuracy are important. Knowing how to assemble a tent, you can not worry that outdoor recreation will go down the drain.
Children are very fond of building houses from any material at hand: chairs, armchairs, sofa cushions, blankets and rugs are used. In such houses it is so wonderful to play with dolls, hide from the evil Baba Yaga and turn on a flashlight in the dark.
One thing is a pity, this house is not strong. One move and the roof is already broken. And then the walls along with it. The kids are upset. But the parents are excited: how safe is such a house?
An excellent way out was the children's play tents that appeared on sale. Lightweight and durable, they can look like a real castle for a princess, a house with a tunnel, or even a car.
As a rule, they are installed in just one movement. But collecting them after the game is not so easy. How to fold a children's tent to put it in a small bag? So there is such a tent in the corner of the room for months. Or on the balcony.
But the inscription on the cover states that you can pack a play tent in a cover in one minute. What are we doing wrong? Let's figure it out together.
What is a children's frame play tent?
Such tents can have a different appearance - ladybug, round house. But all of them are very similar to ordinary tourist tents, installed using a tubular frame.

The tubes are assembled into longer ones, pushed into the grooves of the cloth of the house and fixed in special pockets or tied with ropes.

It’s easy to disassemble them - untie the fastening ropes, remove the frame and fold the canvas itself. Tourist tent going a little longer, but only because of the large dimensions.
What is a wire children's tent?
The situation is quite different with wire play tents. At the heart of the frame is a thin and strong wire.
Installing one really takes one minute: you just need to get it out of the package and unfold it. Thanks to the elastic wire stiffeners, the tent itself takes the desired shape.
But not everyone succeeds in putting together a tent the first time. Probably because parents are afraid to damage the stiffeners or do something wrong. If your house does not have assembly instructions or you can’t figure it out in any way, try using our algorithm of actions.
How to fold a children's square tent-house: step by step instructions

- Stand facing the wall of the house (any) and grasp the ribs on both sides of it with your hands.
- That rib you hold right hand(or left, if you are left-handed), push forward - to the opposite corner.
- Now the house looks like a book, which you fold, closing the pages.

- Hold the folded house by the side ribs in their lower third (“floor” towards you, roof away from you). Move your hands with each other, as if turning one on the other. In this case, the wire ribs will fold into a figure eight when you join your hands.
- Place the two "heads" of your figure eight on top of each other.
- In your hands, the house formed a ring. Now it's easy to put it away round case.

The video will illustrate the addition process in more detail:
If the figure eight is not given to you or the design of the house does not want to develop in this way, try another option:
- Put the flat house folded into a “book” on the floor or any other surface.
- Bring the lower part ("floor") up - to the "ceiling". The right hand holds the lower part of the house, while the left hand holds the sidewall in the middle of a rigid wire rib.
- Gently press the side against the top. Landmark - the right hand is in the center of the upper part of the house. Here, pull the sidewall to it.
- Since the tent has stiffeners, when folded in half, the house has rounded sides. Folding the side part, turn it a little, like a steering wheel, around its axis.
- Press it, too, with your right hand, turning it into a ring.
- The second half is placed on top of the first.
- You have a comfortable circle in your hands again. Put it in a case.
And a couple more detailed videos on folding a square children's wire house, in the second, the process of folding the frame into a circle is presented in a detailed slow-motion version:
How to fold a children's triangular tent: a detailed algorithm

- This house is more appropriate to call, rather, a pyramid. Stand facing one of its sides. Insert one rib inward, pushing to the opposite.
- Tuck all parts of the panel inward towards the center and get a flat triangle.
- The elastic band located on the bottom of the house must remain outside.
- Grasp the top of the triangle and the middle part of the base. With a rotational movement of the hands, making a figure eight, connect both hands.

- OR press the top to the base. The side parts of the resulting structure, as in the case of a tent-house, will become rounded. Wrap one circle to the center of the base. The second will develop on its own.
- Secure the resulting circle with an elastic band.
- You can put the folded tent in the bag.
The folding algorithm is even more clearly presented in the following videos:
How to assemble a children's round tent "Princess Castle": a scheme of actions
Can such a large and luxurious castle also be hidden in a small round container bag? Exactly.

Princess Castle belongs to the category of frame tents, which are assembled according to the principle of adult tourist.
- Remove the upright stick from the frame. They hold the tower cylinder upright.
- This long stick consists of several small ones, worn with an elastic band. Stack them up.
- Do the same with the rest of the sticks of the frame of your castle.
- You are left with a round base and a round top of the tower. Connect them to each other. Tuck the cylinder head inward.
- Grab both sides of the circle with both hands. And again make a figure eight - turn one hand down and the other up.
- Connect the two circles of the eight.
- With an elastic band attached to the base of the tent, secure the resulting structure. The castle is ready to "hide" in a round case.
How to assemble and remove a tent-bus, car, train and other "unearthly beauty"?
As you probably already understood, all children's tents, regardless of their appearance, are added according to the same principle. The scheme of your actions is the same in any case: connect the side faces, get a flat figure and twist the figure eight out of it with a light, graceful movement.
The figure eight also needs to be folded in half and - voila - the tent is folded!
general information
The tent is the same house. How it will be built, normally or clumsily, depends solely on you. If you do not know how to assemble a tent, then this is not a problem. Today there is a mass of literature where you can read the instructions. But we will tell you how to assemble a tent quickly, efficiently and reliably. This article will walk you through the steps of the entire process.
Leisure
Tent tourism is quite a popular and pleasant form of recreation. Many people can't even imagine a better time! They can be understood. After all, it's nice to take everything you need with you and just hit the road towards adventure! Only often before leaving for a wonderful vacation, the question suddenly arises, how to assemble a tent? No need to get upset and postpone the trip because of such an insignificant reason. We have already promised that we will help you and give practical advice on how to assemble a tent with your own hands. Today we will consider not only the assembly instructions, but also several types of tents.

Spread the fabric tent, and then install the front and rear posts inside. They need to be well fixed, only then stretch the tent itself and fix it with pegs.
detailed instructions
Step one is finding a place. Look for comfortable spot for your future home. Choose a level surface without sticks or stones. If there are still bumps, snow and others, then just clear this place.
Step two - get the tent. Take everything out of the case and look at the completeness. There are several types of tents, but in general the following set can be distinguished: an awning, an inner tent, pegs and arches. Find the inner tent, it usually has a different color (usually bright yellow). Spread it upside down.
Step three - set the arc. Take arcs (tubes with ropes). Assemble the arc into a single whole "stick", thread it on inner tent into the loop (in the corners), thread through the diagonal into the second loop. Then do the same trick with the second arc. Now all you have to do is attach the inner tent to the poles with the fasteners that look like a plastic clip.
Step four - we put on the awning. Snap an awning to the inner tent (at the corners). Remove the pegs and insert into the loops. Hammer the pegs at an angle, if they are not, then make them from thick branches. There are special ropes on the tent, they are necessary for stretching, tie them to trees or attach them with a peg to the ground.
Step five - dig in the place. It is necessary to do this around the perimeter, and ten to fifteen centimeters in depth is enough. Suddenly it will rain, you won't have to swim in your house.

How to assemble an automatic tent (Chinese manufacturer)
These tents are very easy to set up. By the name, you can easily guess that they are laid out automatically, with little or no help from outsiders. To “start” such a mechanism, you only need to remove this moving house from the cover, therefore, the question is how to assemble Chinese tent does not even occur. However, assembling such a house is not an easy task. You can talk about this for quite some time, so we recommend that you watch videos, of which there are many on the Internet today.
The author of the presented video and, concurrently, the owner of the shown tent, immediately stipulates several conditions. The product is quite light, two people can fit in it, although three are declared, it is not at all expensive, and the main plus is that installation takes no more than a minute. A wonderful quality when you are unexpectedly invited to a hike or picnic, and there is practically no time left to carefully pack.True, the young man immediately reports that on a multi-day trip it is better to choose something of higher quality and stability and proceeds to the demonstration. Indeed, he managed to deploy and put up a tent of this type, even if not the first time, but he succeeded quite easily. In appearance, it is quite suitable as protection against rain and all-penetrating mosquitoes. No need to drive in pegs, put up stretch marks and stretch the awning. Everything is really simple.
But the most important thing in this five-minute video is its last part. In working order, the tent is quite bulky, and how to fold it into its original position is a real puzzle. Chinese production does not inspire confidence that something will not break. However, the author shares his secret. Not complicated hand movements and the tent is again behind you in the form of a small round backpack. Watch the video "How to fold a tent into a round bag" on good quality 720HD. All materials of 2017 and 2018 are contained on Youtube.com and are available on our website without registration.